
Generally, I build something and after having built and then rebuilt it several times over a few months to improve the outcome, I’ll write it all up in a very long post. This time, I am building King’s Cross station and have decided to break it up into smaller bits as the build progresses. Here is part 1 – enjoy…
Background
Platform 9¾ on King’s Cross station in London is as iconic Harry Potter as it gets. We’ve all seen Harry walking around the station looking desperately for the entrance, how he managed to get there with the help from the Weasley family and then arriving onto the “secret” platform, seeing for the first time the scarlet train with the steam engine in front ready for the trip to Hogwarts.
It is therefore not surprising that Platform 9¾ has featured in two official LEGO sets already; first in the 2001 Hogwarts Express (set 4708) and then in the 2018 Hogwarts Express (set 75955 – see review here). Both sets include the feature of “walking through the wall” to get to the platform.

We all know that Hogwarts Express leaves from Platform 9 ¾ at King’s Cross station. But that wasn’t actually the intention. When JK Rowling wrote it, as she was actually detailing Euston station, which is also in London, but just a little off. This was discovered when she described Platforms 9 and 10, however the real 9 and 10 at King’s Cross aren’t even in the same building.
I wrote Platform 9 3/4 when I was living in Manchester, and I wrongly visualised the platforms, and I was actually thinking of Euston, so anyone who’s actually been to the real platforms 9 and 10 in King’s Cross will realise they don’t bear a great resemblance to the platforms 9 and 10 as described in the book. So that’s just me coming clean, there. I was in Manchester, I couldn’t check.
JK Rowling, “Harry Potter and Me”, BBC Christmas Special (British version), 28 December 2001
When filming, the filmmakers simply used Platforms 4 and 5 at King’s Cross instead to remedy the issue, thus creating the iconic location for the magical gateway to the Hogwarts Express.
King’s Cross station is also looking a lot better than Euston, but to be honest it is not as visually appealing as others stations like St Pancras Station right next door. Interestingly, the Weasleys parked their car in front of St Pancras in Harry Potter and the Chamber of Secrets, so the movie had its beautiful neo-gothic facade as background when Harry and Ron took of in the flying Ford Anglia, after they hadn’t been able to get onto the platform.

Mistake or not and visual appearance aside, in the Harry Potter universe, King’s Cross is the place Hogwarts Express leaves from. So that is what I wanted to build – not Euston, and not St Pancras.
Like many train stations in London, King’s Cross station is at the end of the line (or many lines) extending out to suburbs from its location in London. There are no through trains, and it is therefore not really suited for a rail loop at home. But with the scale I was after, it was too big for that anyway.
And as an added benefit, it would nicely complement my custom Diagon Alley London scenery.
Making plans
This seems to have become my major build of 2022. I had actually planned to build the Ministry of Magic, but that will be later (maybe I can sneak in another large build later in the year). The reason is that I needed to contribute to my LEGO club’s train display. We were short on items to display there, and then I got the idea to build King’s Cross – so it could both be used for the train display and when I display my Harry Potter stuff.
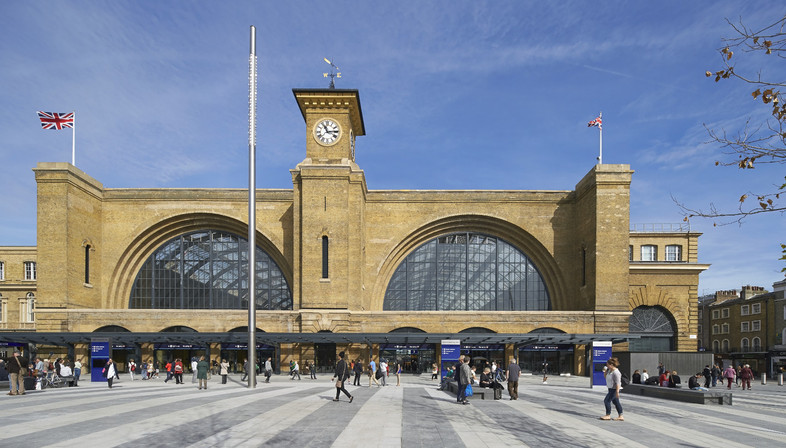
But let’s take a look at the actual station. Here’s a photo I took of the station when I was in London in 2018 – and yes, that’s a Harry Potter minifigure in front, which I carried around in my pocket for photo-opportunities when travelling around England. I may be a LEGO Harry Potter nerd…

The build wasn’t really planned, but luckily I had accumulated a lot of tan (or sand yellow as the official LEGO name is) bricks for future extensions to my Hogwarts castle. And tan seemed to be the perfect colour for the brickwork. For roof, I settled on dark bluish grey, though I didn’t pay too much attention to the roof this early in the design. That was a challenge for later – though it would probably have been good to think that through from the beginning.
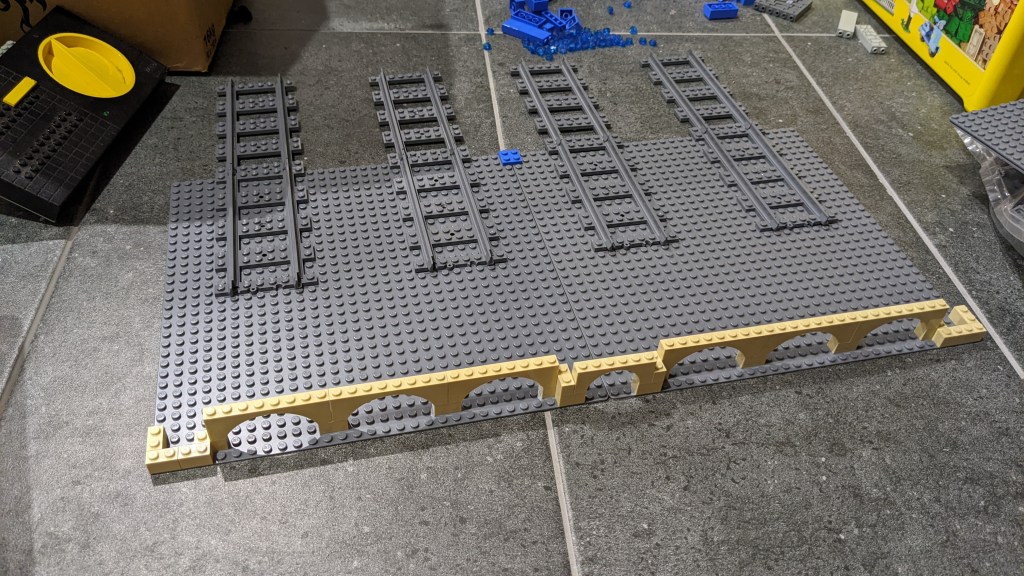
For size, I wanted to capture the central “tower” with the two arched windows on both sides along with the side towers with the flagpoles too. I realised, I could just fit that on two normal baseplates (each 32×32 studs) in width. As it turned out, it was pretty much the perfect size in terms of geometry. A lot of things need to align when you are trying to make such a build from available LEGO pieces.
Also, having two baseplates in width, allowed me to have four tracks going into the train station using the typical standard for track geometry. That is a pretty good number for a large LEGO model, but of course much less than the real station. And if I numbered them 1-4, I wouldn’t get any entrance to platform 9 ¾. Hence, my train station will have them numbered 8-11 instead.
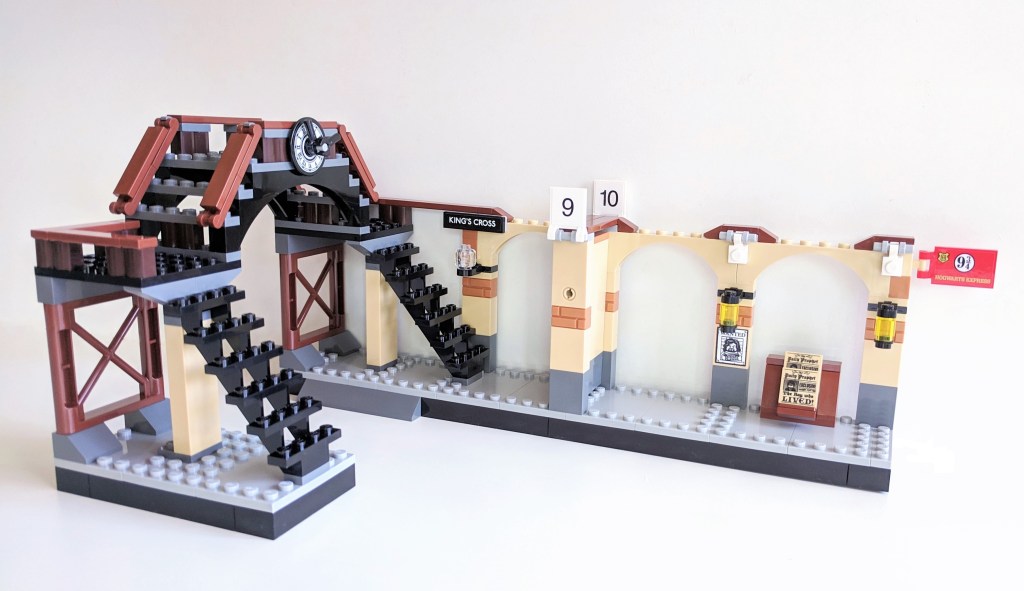
As seen below, the train station has a side building on each side. For now, those have been left out. This is partly to save costs, partly to ensure you can see the inside of the train station from the side. I plan to add a lot of detail, so it would be a shame if you couldn’t see it. I may add at least one of those side buildings at a later stage though.
Starting to build
Some would start up a digital designer program and start building there. I very much prefer to build with real bricks, so that is what I did.
The hardest is always to get started, so I tend to try to fit the main features first to see if that will work. Once I’m happy with those, I start to add height and detail.
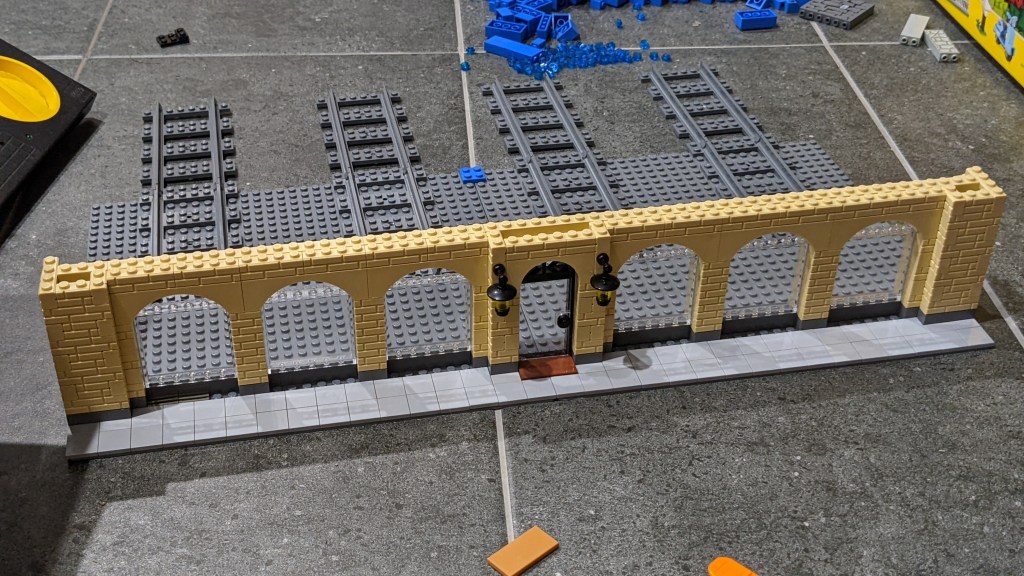
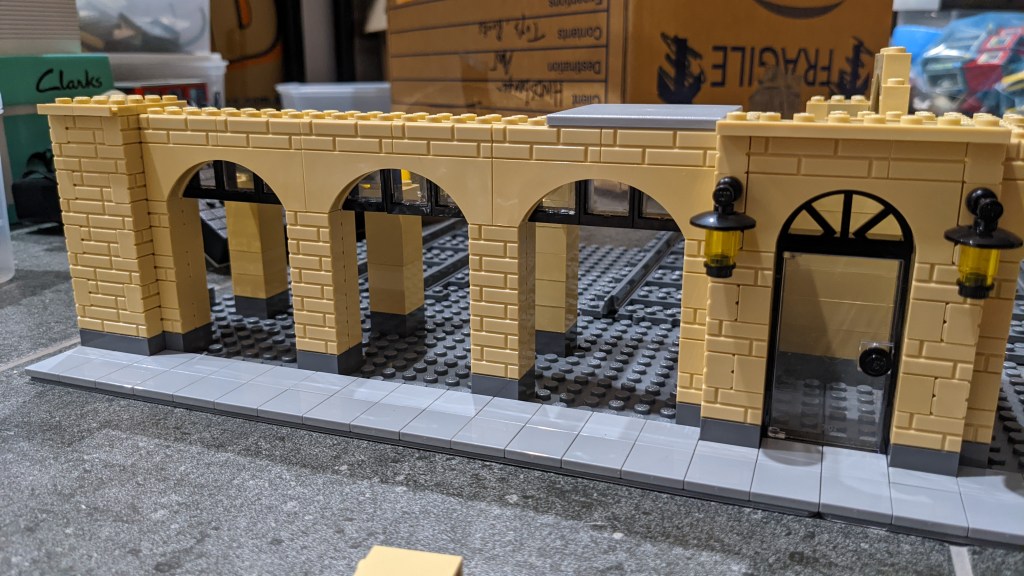
Here’s the very first attempt to capture the three arches on both sides at ground level, and the door in the central tower. You can also see the tracks coming into the station as a placeholder.
It seemed to work well, so I started adding both height and detail. Progress was quick so far. And yes, the build is being done on the floor, as all table space was taken up by other models…
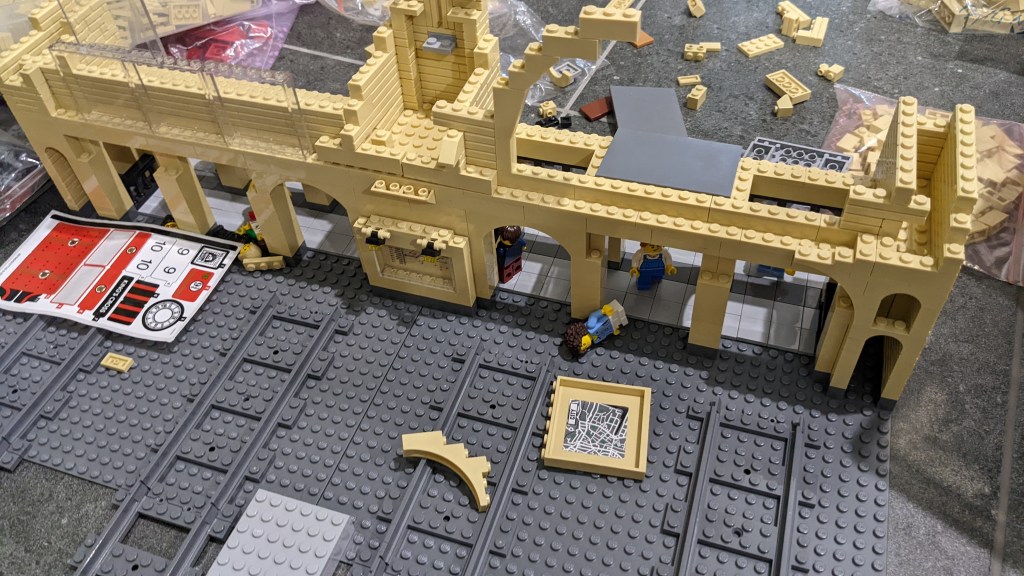
But it is not just the facade I wanted build. So I started adding some depth. On both sides of the “central tower”, I wanted ticket booths as shown below. To tie this in with the facade for a solid build, some rebuilding was needed at this stage.

Here, I’ve added a second round of columns in the back and started to think about what roof there should be on top of that section. .
In the end I opted for the 6×8 sloped bricks, which was a perfect size with each side needing three. Here and many times later, I was lucky that the parts that were available always seemed to be perfect for the two baseplate width. Unfortunately, I didn’t have any of those slopes in dark bluish grey. So that was one of the first Bricklink orders.

Above, you can also see the beginning of one of the two large arches on each side of the central tower. You can also see I’ve started to extend further into the station itself. I wanted a long row of arches extending in to hold the roof (eventually) and for one of those arches to be the entrance to Platform 9 ¾.
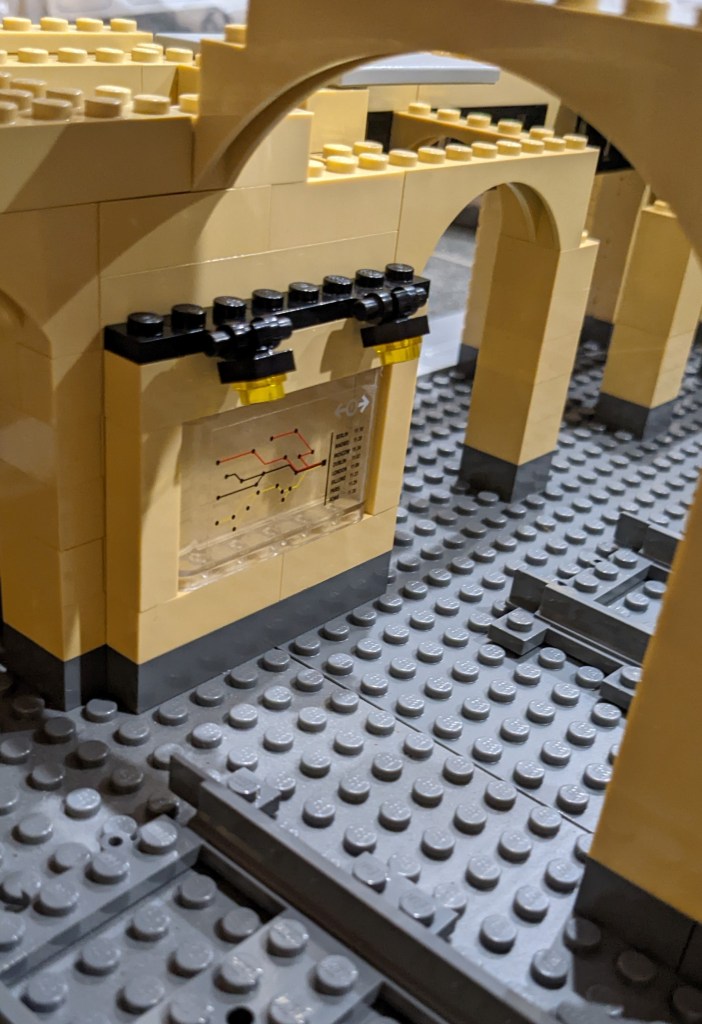
Behind the ticket booths I wanted a time table for the trains. Eventually, it became a city map instead, the time table being relocated (to a yet undetermined location).
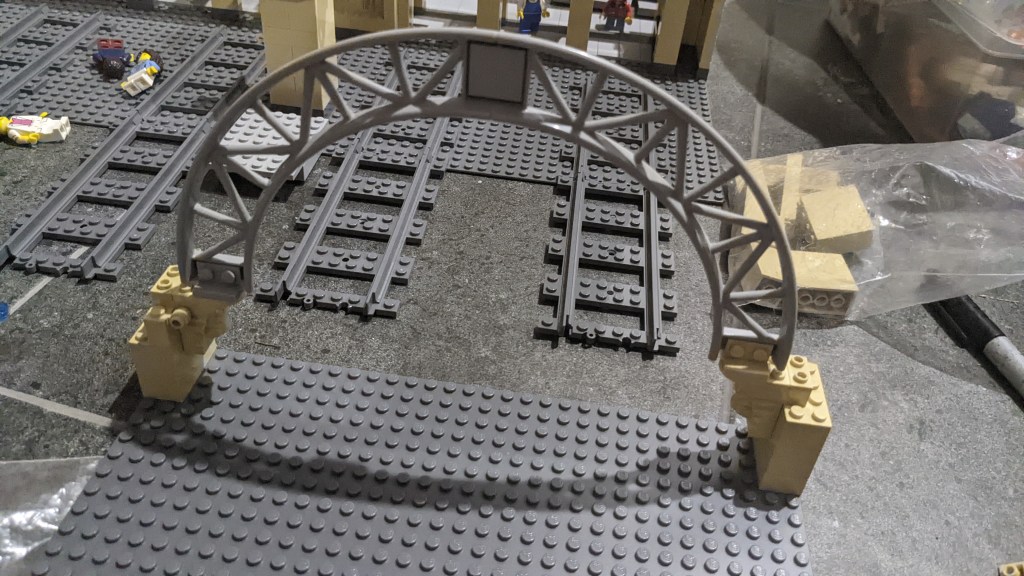
Around this time I started to think about roof design. Basically, each of the two main arches from the front have a large curved roof extending back over the tracks from there. I needed something to hold it up. Here’s an early idea (I brainstormed the design with Cade Franklin, winner of LEGO Masters Australia season 1). I’ll cover the design in much more detail in the next post.
Here is a view from the back. I’ve added more height to the central tower and tried to design a column in the middle to hold the roof. The light grey platform at the bottom will become Platform 9 ¾.
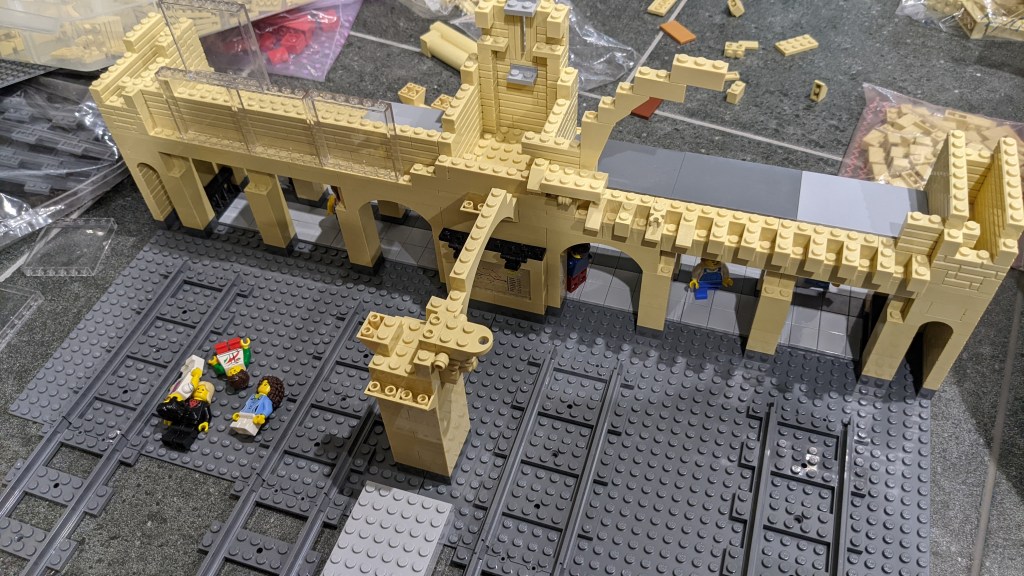
And here, I’ve pulled some of it apart, as I had redesigned how I wanted those large arched windows to be. It was the third or forth major rebuild of the front (and not the last either).
I had finally settled on the final design of the arches. The right one below has the right curve now created from different slope pieces. A similar curve is added at the back with a row of 1x2x2 black windows in between. So three studs depth was required for the windows to look nice both from front and back. As you can see, I’ve now started receiving my dark bluish grey slopes for the little roof section in front of the arches.

I’ve also added some figures. At this point, I had gone with yellow head normal figures. I wanted many figures in the train station, and that is easiest when you use normal LEGO figures. At various places I replaced the 2×2 tiles with 2×2 jumper plates (the ones that got a single stud in the middle) and attached the figures to them, so they don’t easily fall over.
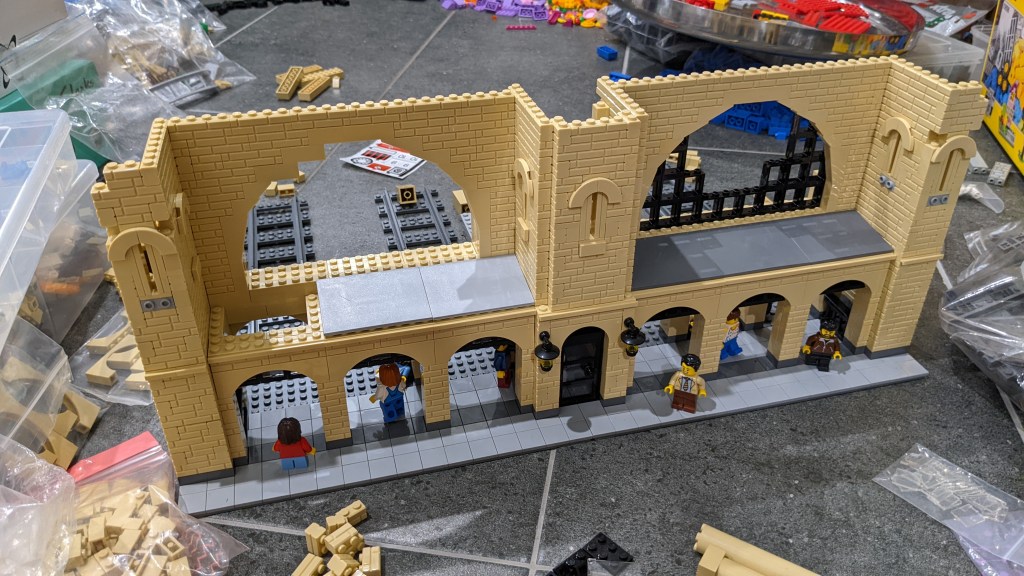
Above, I’ve almost reached full height of the facade (but not towers). I need a few more slopes to complete the window arches (and heaps of black 1x2x2 windows with glass planes).
This may be a good place to stop part 1. Before continuing much further, I needed to ensure I had a viable solution for the roof behind. If not, it could be a show-stopper, or lead to a major redesign. But looking at the front, I must say I had a pretty good feeling about how this was coming along.
That’s all for Part 1. I hope you have enjoyed the read. If so, please leave a comment or a thumbs up. Hopefully, it won’t take too long till Part 2 get written up. It will show the roof design and interior details from the station.
Till then, Build the Magic!


You’ are building a masterpiece,really,Hope to see your wip!
LikeLiked by 1 person
Thanks. Next update should be in a few days (hopefully)
LikeLiked by 2 people