
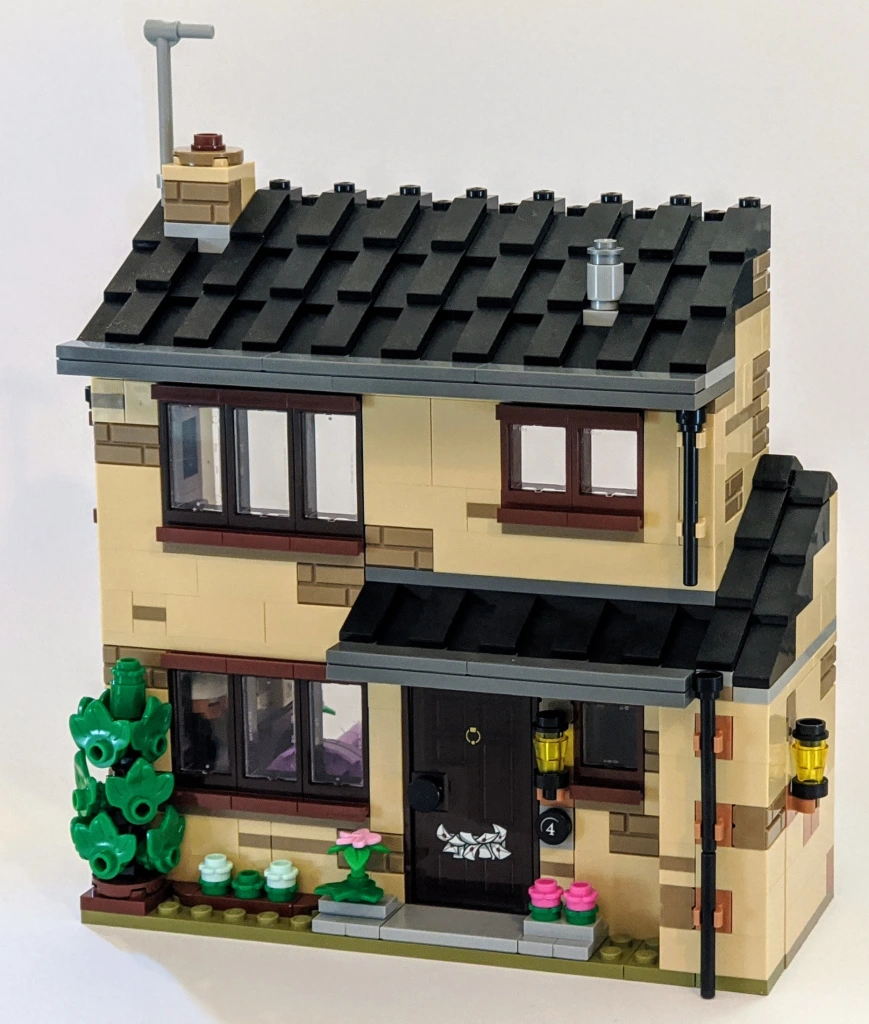
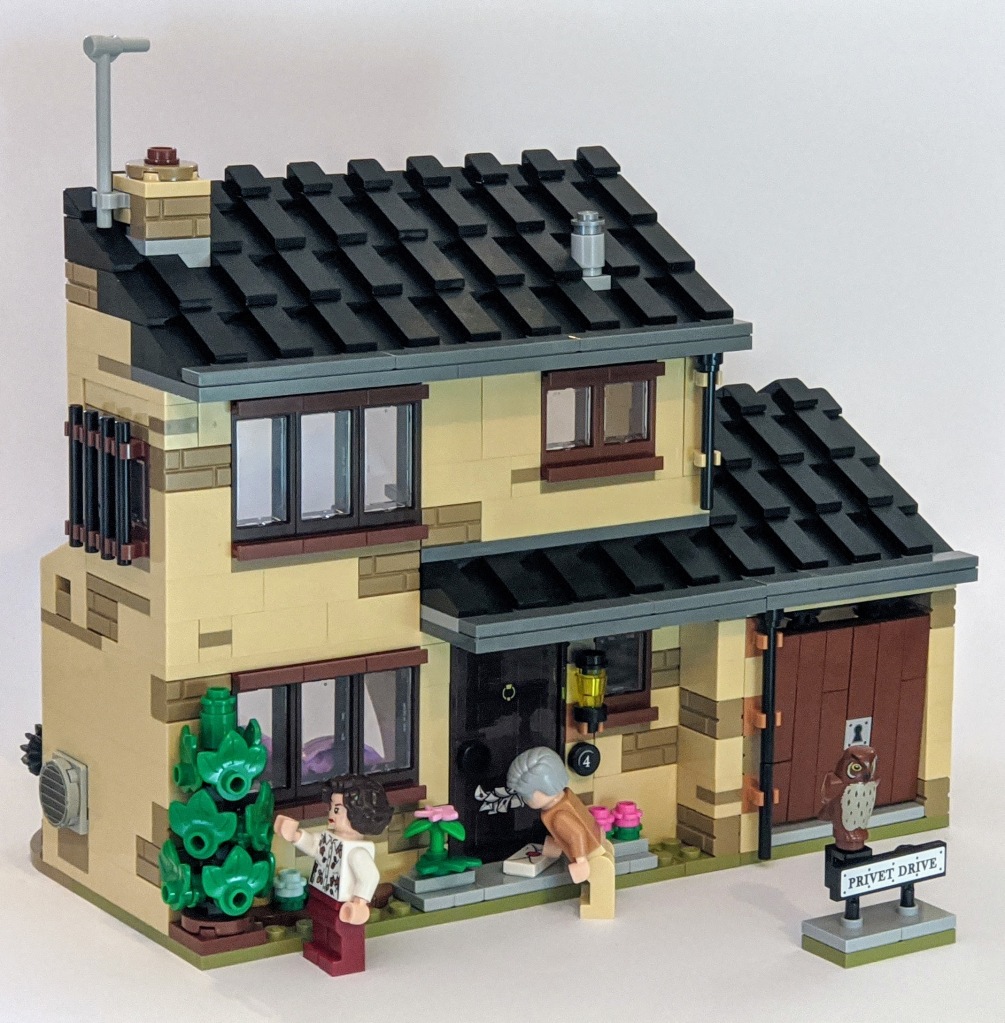
Already the opening scenes of the the first Harry Potter movie introduce us to number 4 Privet Drive, with Harry being left by the doorstep of the house that would become his home after the tragic death of his parents. While he hated his time there, it had some really memorable moments, and it was therefore no big surprise to see it featured among the 2020 LEGO Harry Potter sets. It is an amazing set, but with some modifications, you can make it even better. Here is how…
I recently reviewed 4 Privet Drive (Set 75968) and loved the set. You can see the full review here.
However, I noticed a few areas, where I would like to make changes, in particular adding a garage to make the front look more like the one house in the movies. So similar to my recent post about how to add a back to Hagrid’s Hut, here are a few ideas you can use as inspiration if you consider upgrading your own.
Design principles
Similar to when I upgraded Hagrids Hut, I came up with some design principles before embarking on the upgrades to guide my work. These were:
- Improve visual appearance (focusing on front and sides)
- Keep the style (colour scheme, the open back, etc)
- Do not block/destroy play features.
With that in mind, I raided my spare brick collection and started building…
Let’s get building
In the following sections I’ll cover the upgrades step by step. I’ve tried to document it well with photos for anyone who will have a go themselves.
Part 1 – Fixing up the side…
Starting with the left side (when viewed from the front) of the house, there were two things I wanted to address. I wanted to add less dominant bars for the window and covering the hole in the wall where the mechanism for releasing letters in the chimney is visible.
Firstly, for the hole in the wall, I removed the double cheese slope and added a light bluish grey bracket piece with a 2×2 round tile depicting an air outlet grille. Following this, the mechanism still works and should things get stuck, it is easy to remove the bracket.


For the window, I replaced the antenna pieces with regular 1×4 black bars. The chain from the flying Ford Anglia can still be attached, allowing the Weasley’s to “free” Harry.

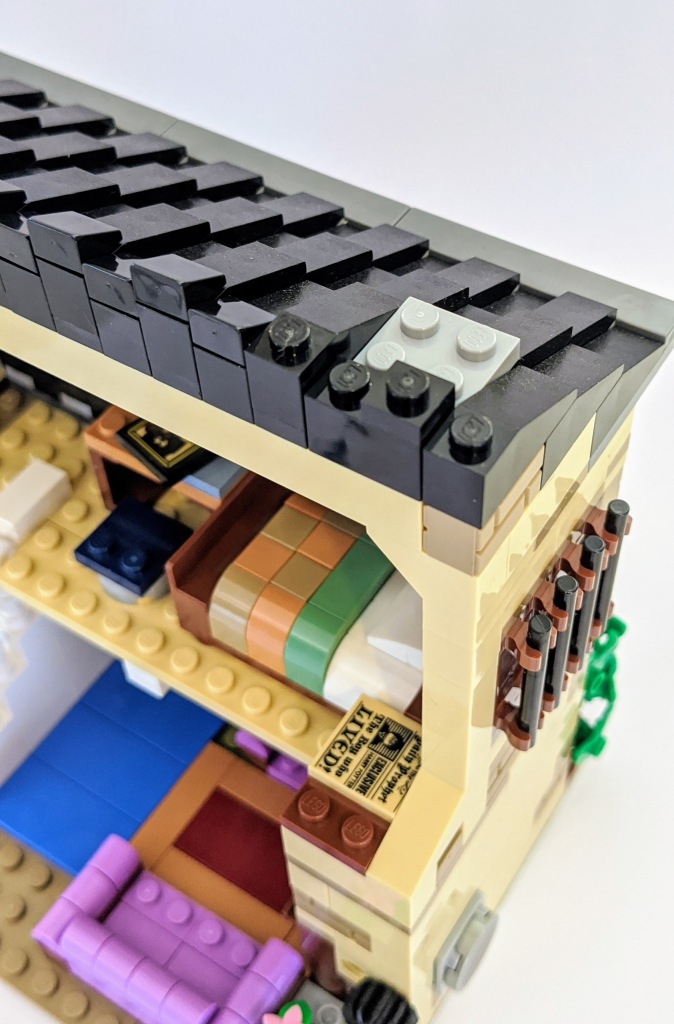
Part 2 – Roof details
This change is by no means necessary, but my OCD got me convinced to prettify the roof of the house, as I realised I had all the pieces I needed for the upgrade. Basically, I wanted to get rid of all the 1×1 reddish brown round plates, replacing them with black 1×1 plates. Around the chimney, that is a bit more complex, but you still need only a few parts to fix. Finally, I added 1×1 black cheese slopes on the roof top.


For the chimney, the following photos show in more detail what I did.

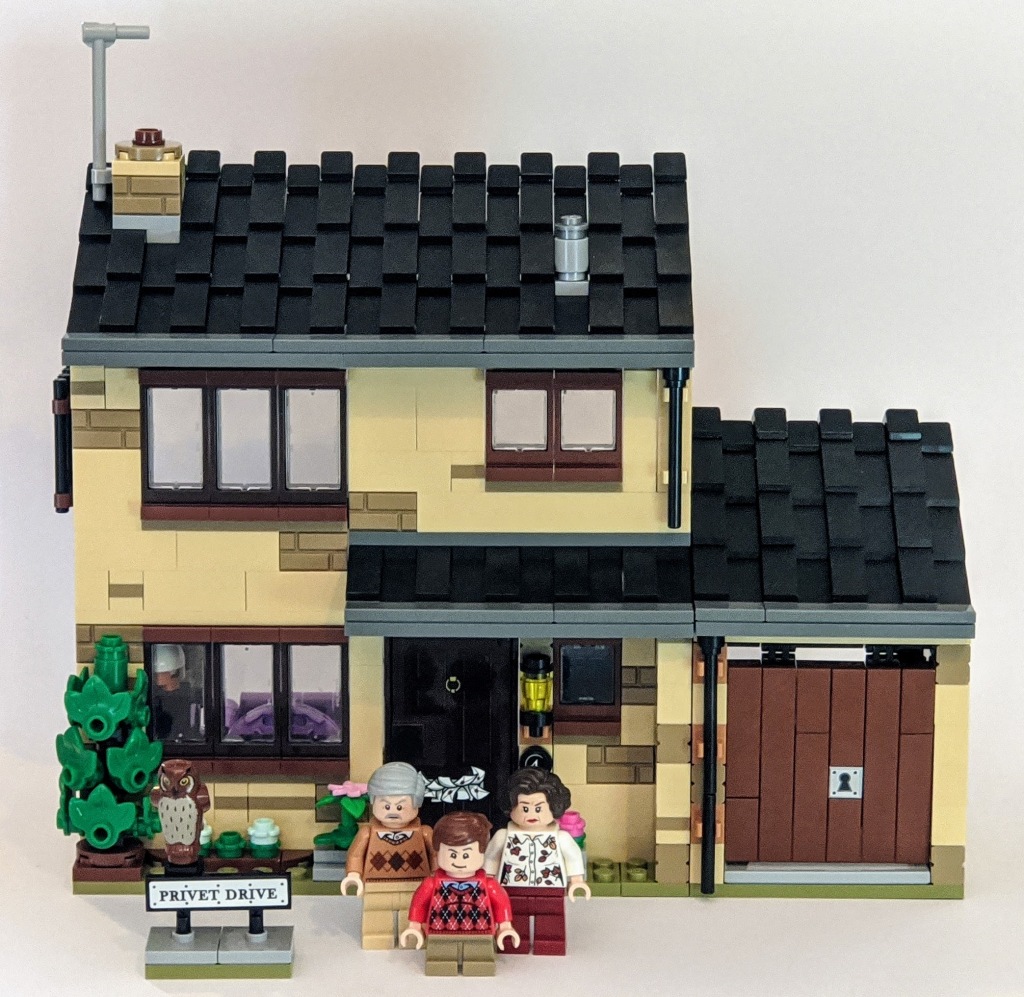
Part 3 – That front look
Here is the major change. To better match the look in the movies, I wanted to add a garage. And to adhere with my design principles, I didn’t want it to block for the access to the cupboard under the stairs. But pulling down most of the wall on the staircase side, and repositioning the lower hinge (of the small piece of wall covering the cupboard in the original version), I built a garage that could swing away from the building, this way opening up for access to the cupboard under the stairs.
Firstly, I removed the 2×6 dark tan and 2×8 olive green plates underneath the house. These are both reused in the following. I then rebuilt the wall to only be one stud deep, as shown to the right below (this also shows the re-positioned lower hinge).

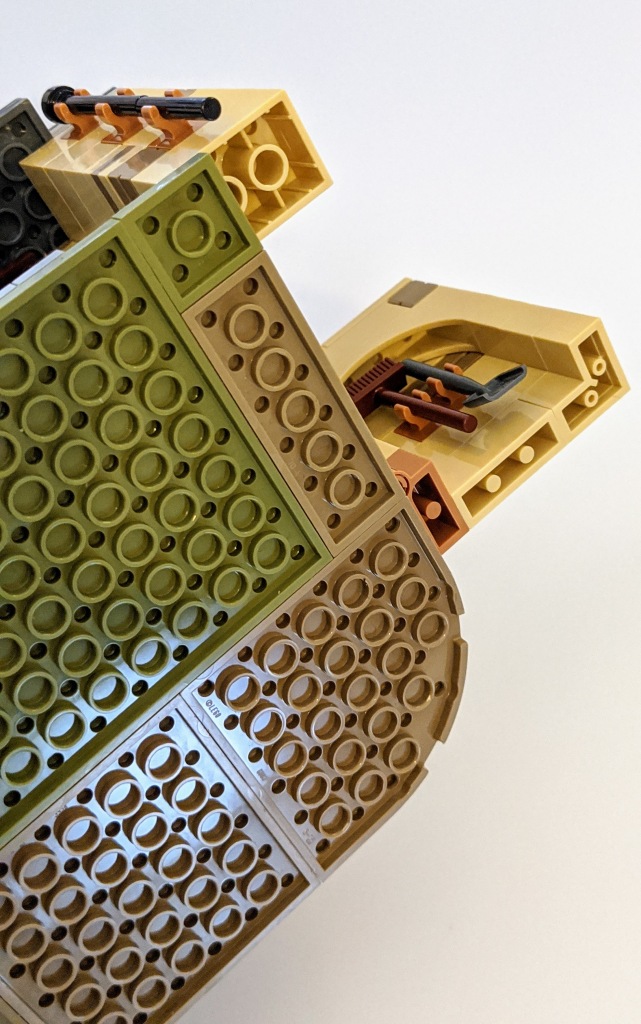

Next, I built the garage. The 2×8 olive green plate was used at the front to match the colour of the bottom layer under the house. Note that for the downpipe from the gutter, I had to replace the 1×4 black bar with a 1×3 bar instead (I used the 1×4 in step 1 instead). Otherwise, it would not fit under the roof that was to be added later.


Having completed the floor and walls, I continued with building the roof section. This included a garage door added on hinges to the ceiling. I here used some old hinges that are only one plate high. I found these worked best with the space I had available.

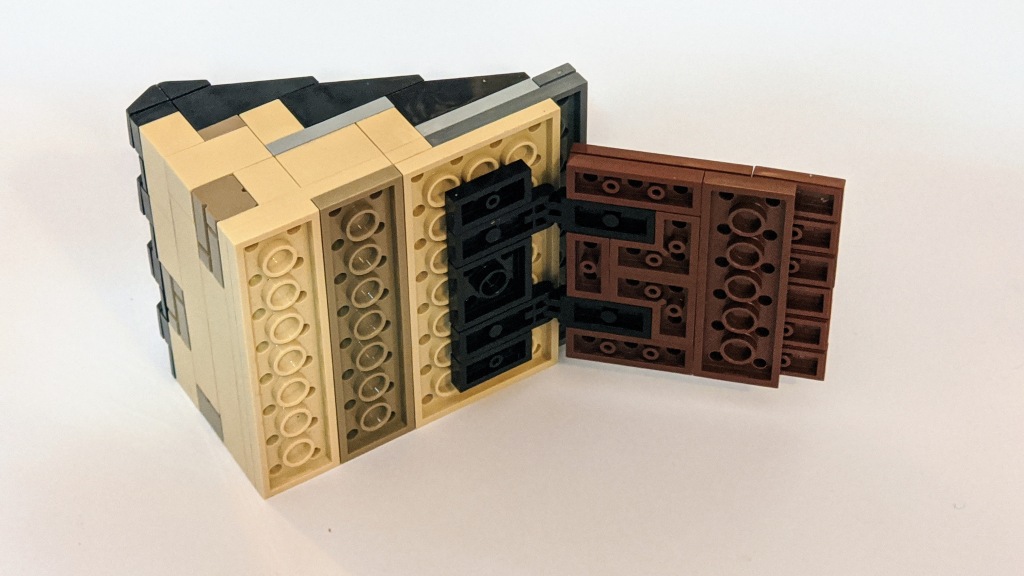
Finally, I connected the garage walls to the hinges on the house, and attached the roof. The whole garage now swings open for access to under the stairs.


For completeness, and absolutely unnecessary, I also replaced the grey 1×1 brick with stud on the side, which had the number four sign. With the building half apart, that was easily done though.


Part 4 – What about the inside?
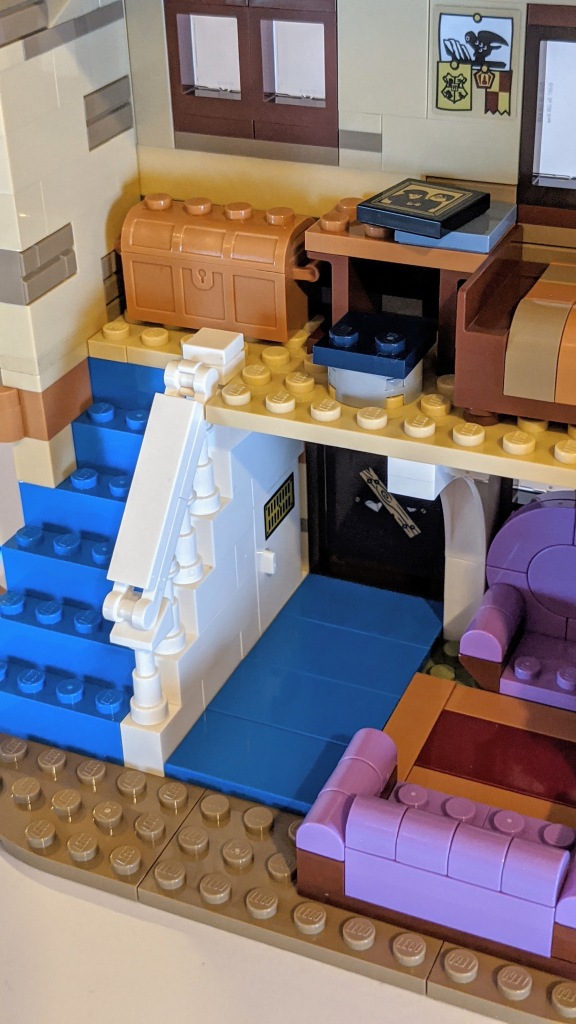
Finally, I made a few updates to Harry’s bedroom. Firstly, I replaced the 1×2 plate with clip and the tile with 1×1 versions. This makes a bit more floor space. Next, the 1×4 dark tan plate used on the floor got replaced by a tan (this was during step 3 when I had the wall taken down anyway). Lastly, I moved around the 1x2x2 panels used as table legs. By doing this, there is just enough room for a chest for Harry to keep all his Hogwarts stuff. But more importantly, the chest covers nicely for the black bricks from the roof over the entrance door, that otherwise shows up inconsistent with the tan coloured wall upstairs.

Summary
Before starting, I wasn’t quite sure how it would look with garage, in particular if the proportions would look odd. But overall, I was very pleased with the outcome.
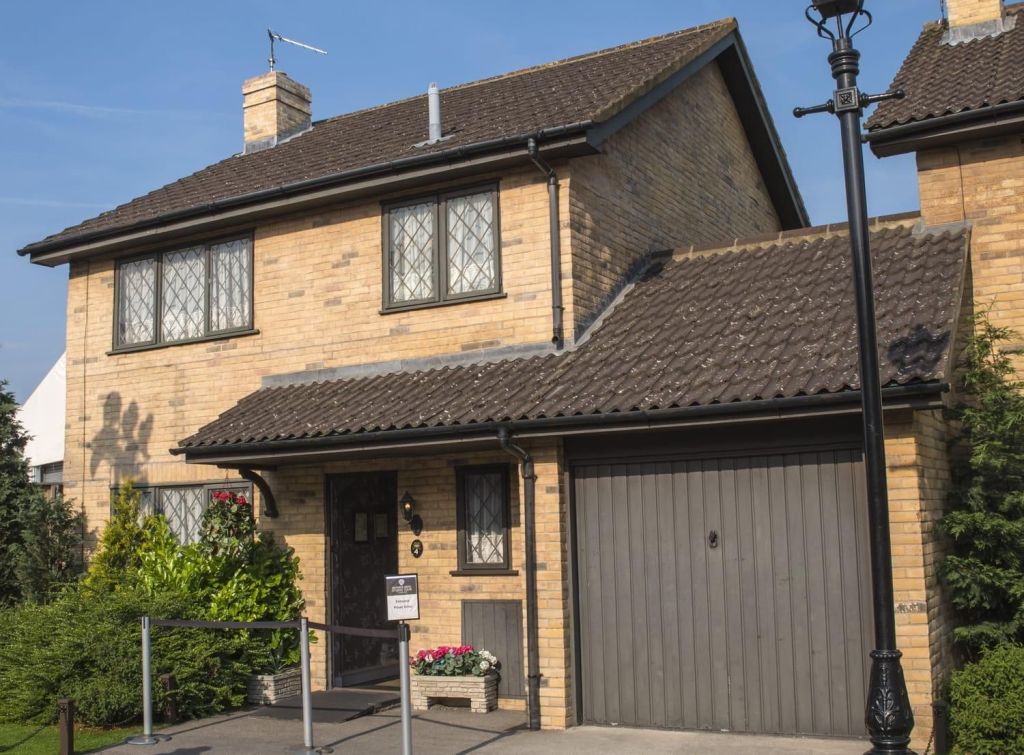
For comparison, here is a photo from the building at Harry Potter Studios used in the later movies (the early movies used an actual suburban house).
This adds to my growing collection of 4 Privet Drive models (I now have four, including two official sets). Here the modified set is shown next to my recently completed MOC (this one as a rather complete interior as well as discussed here).

Following this, I will start looking at the 2020 LEGO Harry Potter sets again. There are quite a few still to review. So stay tuned.
Till then, Build the Magic!

I bow to you! This is absolute brilliant!
LikeLike
I LOVE this and have tried my best to replicate your clever design but I’m struggling with the garage door hinges – do you have a part number to help please??
LikeLike
Hi, I’ve used parts 4275 and 4276. See e.g. https://www.bricklink.com/v2/catalog/catalogitem.page?P=4275#T=C
LikeLike
Thank you so much for that – I’ve managed to complete the garage and I LOVE everything about it. It’s perfect and you are SO clever!
LikeLike
Your modifications were great, I also made some modifications to the set, I removed the side window that is removable, and I transformed the largest front window to be removable, in the film it is this window only that the back window that is pulled out.
And I made some changes in the position of the furniture to leave the exact position of the Secret Chamber movie, for example the bed is facing and not on the side, I made it smaller, and with that I gained much more space. I intended to create the dresser that is edwiges with brown pieces but that famous problem happened when the pieces broke while I was building.
I really recommend this modification of the bed gives a great effect, and you can do it just by removing a few pieces and replacing with simple pieces of any color, as they are hidden by the original pieces of the bed, I would put a photo here if you could see it in the comments.
LikeLike
I LOVE
LikeLike
Hi there! I made a garage based on your model in the bricklink studio to give me a better idea of the bricks to order! I can send it to you if you’d like to upload it to your bricklink account so more people could see that moc addition and get a better idea of the parts list!
LikeLike
Thank you. It would be truly awesome with such a file to upload. Can you send me a note using the contact form so we can organise: https://blockwarts.org/contact/
LikeLike
Finally will be available the Bricklink list for your Upgrade of 4 Privet Drive? We are relly interested !!
LikeLike